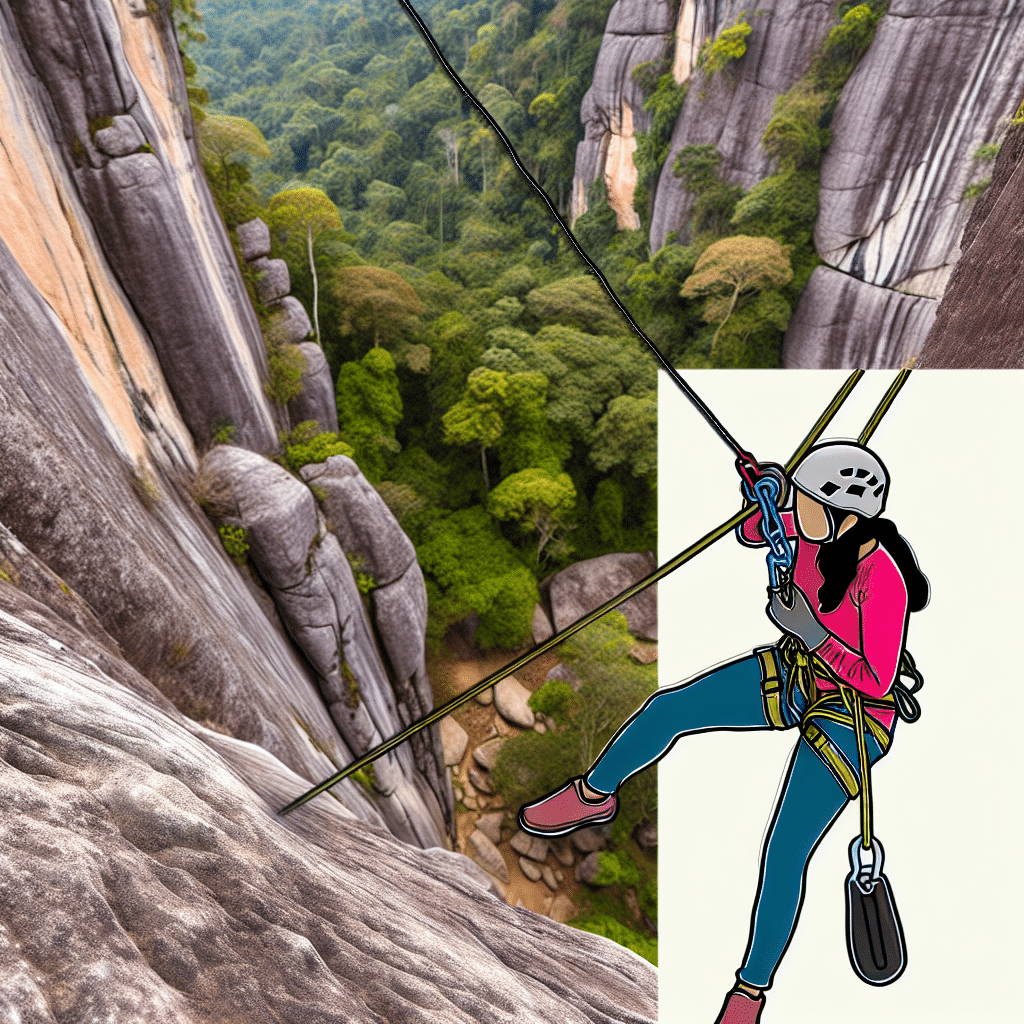
Imagine standing at the edge of a breathtaking cliff, a thrilling vista stretching before you. The only way down? A single rope, beckoning you into the vertical world. This is the essence of abseiling, an exhilarating technique that transforms daunting heights into incredible adventures. For rock climbers, mountaineers, and any outdoor enthusiast, mastering abseiling (also known as rappelling) is a crucial skill that unlocks unparalleled access to wild, steep terrains.
While the idea of descending a sheer face might seem intimidating, learning the basics of abseiling under proper guidance is surprisingly accessible. It’s a skill built on trust in your equipment, controlled movements, and a deep respect for safety. Ready to conquer gravity and explore new dimensions of the outdoors?
What is Abseiling (Rappelling)? An Introduction to Vertical Exploration
Abseiling originates from the German word “abseilen,” meaning “to rope down.” It describes the controlled descent of a vertical or near-vertical surface using a fixed rope and specialized friction devices. This fundamental skill is vital across a range of outdoor activities.
You’ll find abseiling extensively used in rock climbing for safe descents after a climb, in canyoneering to navigate waterfalls and deep gorges, and in spelunking to explore cave systems. Even search and rescue teams rely on precise rappelling techniques to access difficult areas. It’s more than just a technique; it’s a gateway to new adventures.
Essential Abseiling Equipment for a Safe Descent
Before you even think about leaning back over an edge, assembling the right gear is non-negotiable. Each piece of abseiling equipment plays a critical role in your safety and control. Here’s a rundown of what you’ll need:
Climbing Harness: This is your primary connection point to the rope. A comfortable, well-fitting harness wraps around your waist and thighs, distributing your weight evenly and securely.
Dynamic Rope: Specifically designed for climbing and abseiling, a dynamic rope has a slight stretch to absorb impact. Ensure it’s of adequate length and strength for your intended descent, typically rated by UIAA standards.
Belay Device (Descender): This crucial device controls your descent speed by creating friction on the rope. Popular types include the ATC (Air Traffic Controller) and Figure 8, each with slightly different handling characteristics.
Locking Carabiners: These metal connectors with spring-loaded gates are used to link various components, like your belay device to your harness. Always use locking carabiners for any critical connections in abseiling.
Helmet: Protecting your head from falling debris, bumps, and potential impacts is paramount. A climbing-specific helmet is lightweight and designed for outdoor use.
Gloves: Protect your hands from rope burn and provide extra grip, especially during longer descents or in wet conditions. Leather or synthetic gloves designed for belaying are ideal.
Anchors: These are the secure points to which your rope is fixed at the top of the descent. They can be natural (sturdy trees, large boulders) or artificial (fixed bolts, cams, nuts). Redundancy is key – always aim for multiple anchor points.
Mastering Abseiling Techniques: Your Step-by-Step Guide
Understanding the fundamental techniques is the core of safe and enjoyable abseiling. From setting up your system to controlling your descent, precision and patience are your best allies.
Secure Your Foundation: Anchor Setup
The anchor is your lifeline. Its integrity is non-negotiable. It must be “bombproof” – capable of holding many times your body weight, even under dynamic loads.
Assess and Select: Choose anchors that are undeniably solid. For natural anchors like trees, ensure they are alive and robust. For artificial anchors, verify their placement and integrity.
Redundancy is Key: Whenever possible, use multiple anchors. This principle, known as redundancy, means that if one anchor point were to fail, the others would still hold the load, dramatically increasing safety.
Equalization: Distribute the load evenly across multiple anchor points. This prevents shock loading on a single point and maintains stability.
Test and Double-Check: Once set up, always visually inspect and gently test your anchor system before committing your weight. Look for any signs of wear, movement, or improper rigging.
Gearing Up: Preparing for Descent
With your anchor meticulously set, it’s time to rig your rope and attach your personal gear. This stage requires careful attention to detail.
Rigging the Rope: Thread your rope through the anchor point. For a single-rope descent and retrieval, ensure both ends reach the ground or a safe ledge. Always tie stopper knots in the ends of the rope to prevent abseiling off the end.
Attaching Your Belay Device: Connect your belay device to the belay loop on your harness using a locking carabiner. Pass the rope through the device according to its specific instructions. Ensure the rope is threaded correctly for friction.
The Final Safety Check (Buddy Check): Before you lean back, perform a thorough personal safety check. Is your harness buckled? Helmet on? Belay device correctly loaded and locked? If abseiling with a partner, conduct a reciprocal buddy check to catch any missed details.
Controlled Descent: Executing the Abseil
This is the moment of truth! Executing a smooth, controlled descent is all about body positioning and managing friction.
Positioning: Lean back slowly, keeping your body in an “L” shape. Your legs should be extended, shoulder-width apart, with your feet flat against the rock face. This provides stability and allows you to push off.
Hand Placement and Control: Your dominant hand (the “brake hand”) holds the rope below your belay device, controlling your speed. Your non-dominant hand (the “guide hand”) holds the rope above the device, helping with balance and feeding the rope. Never let go of the brake hand.
Smooth and Steady: Aim for a fluid, controlled descent. Avoid sudden jerks or jumps, which can cause loss of control or put undue stress on your anchor. Release the rope gently with your brake hand to move downward.
Foot Placement: Use your feet actively to maintain balance and guide your path. Look for stable footholds as you descend, pushing off gently to control your proximity to the rock.
Common Abseiling Mistakes and How to Avoid Them
Even experienced abseilers can make mistakes. Recognizing potential pitfalls is the first step toward preventing accidents and ensuring a safe adventure.
Poor Anchor Setup: The most critical error. Always verify your anchor points for stability, redundancy, and proper equalization. Never compromise on anchor safety.
Improper Use of Equipment: Not understanding how to correctly use your harness, belay device, or carabiners can lead to catastrophic failure. Practice with your gear in a controlled environment until its operation becomes second nature.
Rushing the Descent: Haste leads to mistakes. Take your time, focus on your technique, and maintain a steady, controlled pace. Abseiling is not a race.
Lack of Backup Systems: For beginners or in complex situations, not having a backup like a prusik knot on the rope below your belay device (which acts as an auto-locking brake) or a fireman’s belay from below is a common oversight. These provide an extra layer of safety.
Forgetting Stopper Knots: Abseiling off the end of your rope is a fatal mistake. Always tie robust stopper knots in both ends of your rope on the ground before you start your descent.
Inadequate Communication: When abseiling with others, clear, concise communication regarding intentions and actions is vital to prevent misunderstandings and accidents.
Ready for Your Next Vertical Challenge?
Mastering the basics of abseiling is more than just learning a technique; it’s about building confidence, developing essential outdoor skills, and expanding your horizons. This ability to safely navigate vertical terrain opens up a world of rock climbing routes, hidden canyons, and remote wilderness areas previously unreachable.
Remember, while this guide provides fundamental insights, hands-on instruction from a certified professional is invaluable. Practice consistently, prioritize safety, and always respect the environment. So, gear up, find your instructor, and prepare to embark on thrilling vertical journeys. Happy descending!