How to Build a Raft: Your Ultimate Guide to DIY Watercraft & Adventure
Dreaming of quiet paddles across a glassy lake or a leisurely float down a gentle river on your own handcrafted vessel? Building a raft is more than just a project; it’s an embarkation on a serene adventure, a journey of craftsmanship, and a testament to your DIY spirit. It offers a profound sense of achievement and hones your practical skills.
This comprehensive guide will walk you through detailed plans for building a raft, ensuring your creation is not only safe and functional but also a source of unforgettable memories. Get ready to transform raw materials into a sturdy, personal watercraft designed for calm waters and gentle currents.
Essential Materials for Your DIY Raft Project
Before you begin cutting and assembling, gathering the right materials is the first crucial step towards a successful build. Your choices significantly impact the raft’s durability, buoyancy, and overall safety. Here’s a breakdown of commonly used and recommended supplies.
Buoyant Wood for the Frame
The structural foundation of your raft will be crafted from wood. Opt for naturally buoyant and water-resistant species like cedar, pine, or redwood. These woods are lightweight, resilient, and crucial for ensuring your raft floats effectively while withstanding water exposure.
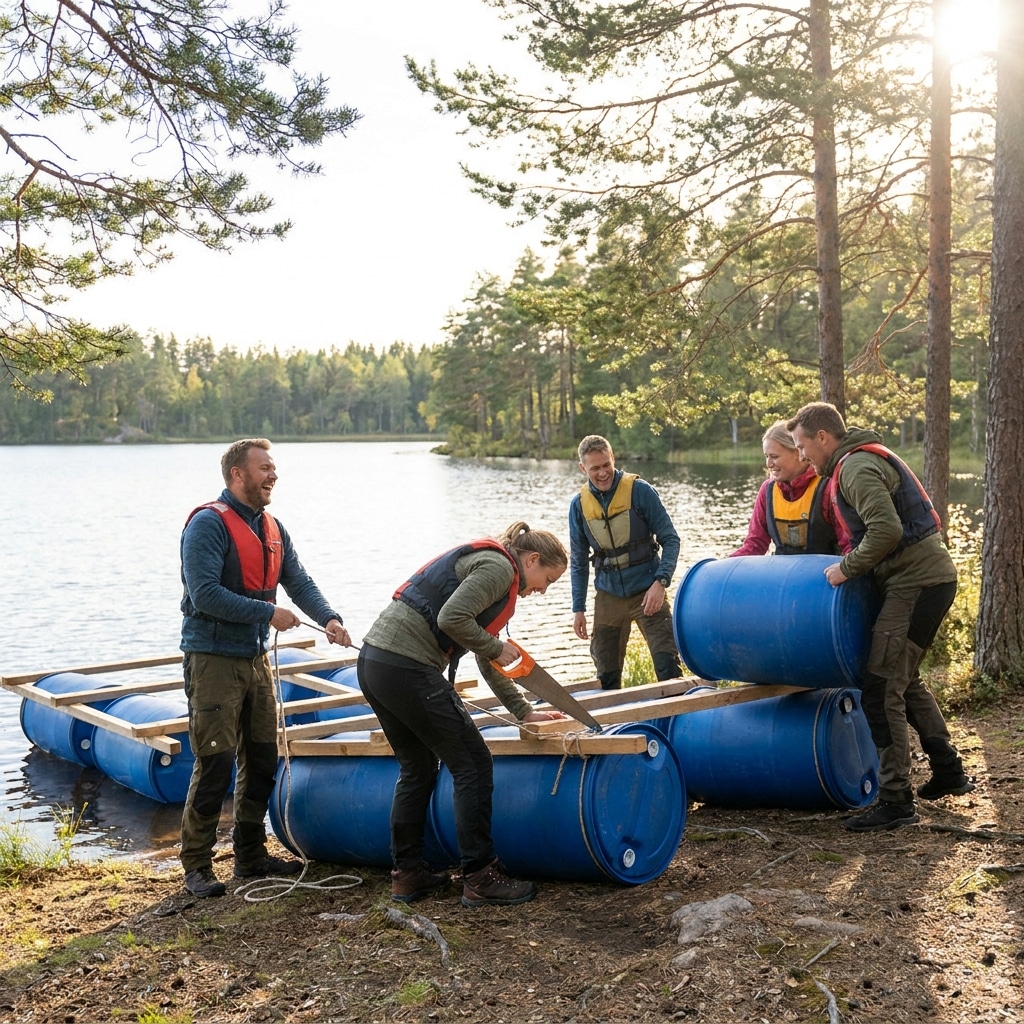
Floatation Devices: Barrels or Drums
For essential buoyancy, plastic barrels or sealed metal drums are indispensable. Ensure they are completely watertight to prevent any leaks that could compromise stability. Typically, four to six standard barrels provide ample floatation for a small to medium-sized raft.
Strong Fasteners: Rope, Screws & Nails
Rope: You’ll need strong, marine-grade, water-resistant rope or cord to lash the wooden frame together and secure the barrels. Nylon or polypropylene ropes are excellent choices due to their durability and resistance to moisture and UV rays.
Nails & Screws: Galvanized or stainless steel nails and screws are vital for fastening wooden parts. Galvanization is crucial as it prevents rusting, which can quickly compromise the structural integrity of your raft in a marine environment.
Tools of the Trade
You’ll require a selection of basic tools to streamline the assembly process. Gather a saw (hand or power), a drill with appropriate bits, a hammer, and a reliable measuring tape. Don’t forget essential safety gear like gloves and eye protection.
Step-by-Step Plans to Construct Your Raft
With your materials ready and your spirit of adventure ignited, it’s time to dive into the construction process. Follow these detailed steps carefully to ensure a sturdy, functional, and enjoyable homemade raft.
Step 1: Design & Blueprint Your Vision
Before any cutting begins, dedicate time to creating a simple design plan for your raft. Determine its dimensions based on the number of people it will carry and the specific water conditions you anticipate. Sketch your design with precise measurements for every component, ensuring you have a clear blueprint to follow.
Step 2: Construct the Main Frame
Measure and cut your chosen wooden planks according to your blueprint. Assemble the outer frame in a sturdy rectangular or square shape, using galvanized screws or bolts to securely fasten the corners. Reinforce the frame with strategically placed crossbeams for added stability and rigidity.
Step 3: Secure Your Floatation Devices
Carefully position the barrels or drums within the frame, ensuring they are evenly distributed for balanced buoyancy. Lash the barrels securely to the wooden frame using your strong marine rope. Wrap the rope around both the barrels and the frame multiple times, tying it off with reliable, strong knots to prevent any movement.
Step 4: Build the Decking
Cut additional wooden planks to fit across the top of your frame, forming a stable deck. Nail or screw these planks into place, ensuring they are tightly fastened and provide a robust surface for standing or sitting. Leave small, consistent gaps between the planks to allow for efficient water drainage.
Step 5: The Crucial Test Float
Before embarking on any grand adventures, conduct a vital test float in safe, shallow, and calm water. Carefully observe your raft for any signs of instability, excessive rocking, or water intrusion. Make necessary adjustments, such as tightening ropes or adding supplementary floatation, until you are fully confident in your raft’s performance.
Prioritizing Safety on Your Raft Adventures
A handcrafted raft promises incredible adventures, but safety must always be your absolute top priority. Thorough preparation and adherence to safety guidelines will ensure your water journey remains pleasant and secure.
Life Jackets are Non-Negotiable: Always wear a properly fitted life jacket when on the raft, and ensure every passenger has one that meets safety standards.
Monitor Weather Conditions: Check local weather forecasts diligently before setting off. Avoid strong currents, high winds, or stormy conditions that can quickly turn a pleasant float into a dangerous ordeal.
Pack Essential Emergency Supplies: Equip your raft with a waterproof first aid kit, a reliable whistle, a waterproof flashlight, and a fully charged mobile phone in a waterproof case.
Inform Others of Your Plans: Always notify someone on land about your intended route, expected duration, and estimated return time. This ensures help can be summoned quickly in case of an emergency.
Know Your Waterway: Familiarize yourself with local regulations, potential hazards like submerged obstacles, and safe access points for launching and landing your raft.
Basic Swimming Ability: Even with life jackets, it’s advisable that all passengers have basic swimming skills.
Tips for a Durable & Enjoyable Raft Experience
Beyond the build, a few extra considerations can enhance your raft’s lifespan and your overall enjoyment. Think about long-term care and ways to make each journey even better.
Regular Maintenance: Before each launch, inspect your raft’s frame, ropes, and barrels for any signs of wear, damage, or loose fastenings. Addressing minor issues prevents major problems.
Proper Storage: When not in use, store your raft in a dry, covered area, away from direct sunlight and harsh weather. This will significantly extend its lifespan.
Personalization: Consider adding comfortable seating, a small cooler tied down, or an anchor for those lazy stops. Customize your raft to suit your adventure style.
Practice Eco-Friendly Habits: Always pack out what you pack in, and avoid disturbing local wildlife or natural habitats. Leave no trace behind to preserve the beauty of your waterways.
Conclusion: Cast Off on Your Handcrafted Journey!
Building a raft is an incredibly enriching project that beautifully combines craftsmanship, creativity, and the thrill of outdoor adventure. By meticulously following these detailed plans for building a raft, you can create a reliable, personal vessel ready for tranquil waters. This endeavor is more than just construction; it’s an opportunity to develop invaluable practical skills and forge unforgettable memories on the water.
So, gather your materials, roll up your sleeves, and embark on the remarkable journey of building your very own raft. It’s time to set sail on your handcrafted creation, embracing the serene embrace of nature from a unique perspective. Safe sailing and happy crafting!